I fixed my computer with glue and newspaper!
My Windows computer at home has three fans in it - one for the power supply, one for the CPU, and one for the video card. Amongst owners of this model computer, the fan on the video card has a bad reputation for failing after about a year. If it completely stops, the video card overheats and sometimes dies. Since a replacement is about US$250, it's an expensive failure.
The video card fan in my computer has been noisy for many months. Sometimes it spins faster, sometimes slower, but always it's groaning and making "I don't want to do this" noises. I knew it was only a matter of time before it failed.
Last wednesday night, I was using the computer and I heard the fan slow and finally stop. To the friends I was chatting with at the time, I had to say "bye, I must go before my computer catches fire!". Stretching the truth a little, but it sounds funny :-)
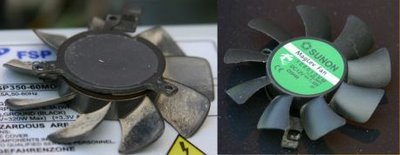 I pulled the computer to bits and removed the graphics card. The fan was very hard to turn, and wasn't fit for duty anymore. Time to replace it!
The only problem is that the fan doesn't have the standard square cage. Instead, it 's fastened to the heatsink by three tiny screws at the end of three legs.
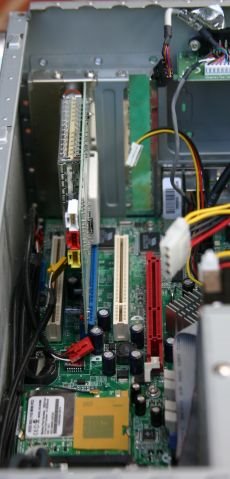
 Well, here's the space the card goes in. There's nothing next to it, which means I have room to make an airpipe to carry air from another fan.
My idea was to mount a new fan at right angles to the old fan, above the Wifi card (that tan-coloured rectangle). Then duct the air from the new fan onto the heatsink of the video card.
First step was to get a block of polystyrene foam. I carved the polystyrene into a shoe shape, being careful not to touch the foam onto any of the circuit boards because of static electricity.
 After making the shoe shape, I got a page from an old newspaper and tore it into squares of about 1 inch. Using water-based paste glue, I started gluing the torn-up squares onto the foam, covering it on every side. After applying several layers, I dried the glue in the oven at 60°C until all the paper was dry and hard.
Once it was hard, I cut the square "heel" out of the shoe for the fan, and the "sole" out of the shoe near the toes for the heatsink. I then extracted all the polystyrene, leaving an empty shoe-shaped shell.
The paper had become surprisingly stiff cardboard. It held its shape very well and knocking on it made a very pleasing rigid hollow sound.
I then took some solvent-based craft glue and glued the fan onto the end of the shoe. When I applied power to the fan, there was an impressive amount of air coming out the bottom of the shoe.
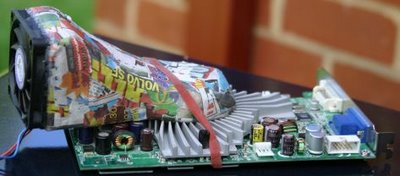 Finally, I glued the shoe onto the heatsink of the graphics card. After drying in the oven, the whole card-shoe assembly became very solid, with the new fan really feeling part of the card. I used an elastic band when drying it, but I decided to leave it on permanently.
 Here's a closeup of where the pipe attaches to the heatsink. The glue forms a seam around the top of where the fan used to be.
For power, I used the old trick of running the fan under the rated 12V. This is much quieter, if you don't need full airflow. In this case, I run the fan at 7V by connecting it between the 12V and 5V wires on an unused power connector. You can find out a lot more at 7 volts, a first-rate site.
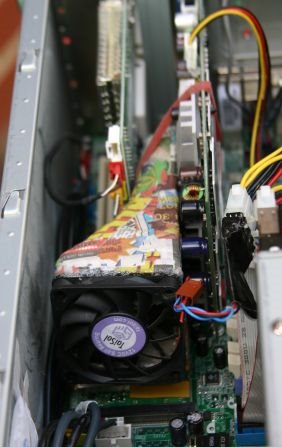
 Finally, I plugged the card into the computer and connected everything up. Fortunately, everything seems to have survived the static electricity, ovens, glues and everything else, and is now working fine.
The video card fan is still the noisiest in the computer (the CPU fan in this computer is wonderfully quiet) but it's a lot quieter than it used to be, and will do the job for another year or two.
Technical details:
The video card fan in my computer has been noisy for many months. Sometimes it spins faster, sometimes slower, but always it's groaning and making "I don't want to do this" noises. I knew it was only a matter of time before it failed.
Last wednesday night, I was using the computer and I heard the fan slow and finally stop. To the friends I was chatting with at the time, I had to say "bye, I must go before my computer catches fire!". Stretching the truth a little, but it sounds funny :-)
 I pulled the computer to bits and removed the graphics card. The fan was very hard to turn, and wasn't fit for duty anymore. Time to replace it!
The only problem is that the fan doesn't have the standard square cage. Instead, it 's fastened to the heatsink by three tiny screws at the end of three legs.
 Well, here's the space the card goes in. There's nothing next to it, which means I have room to make an airpipe to carry air from another fan.
My idea was to mount a new fan at right angles to the old fan, above the Wifi card (that tan-coloured rectangle). Then duct the air from the new fan onto the heatsink of the video card.
First step was to get a block of polystyrene foam. I carved the polystyrene into a shoe shape, being careful not to touch the foam onto any of the circuit boards because of static electricity.
 After making the shoe shape, I got a page from an old newspaper and tore it into squares of about 1 inch. Using water-based paste glue, I started gluing the torn-up squares onto the foam, covering it on every side. After applying several layers, I dried the glue in the oven at 60°C until all the paper was dry and hard.
Once it was hard, I cut the square "heel" out of the shoe for the fan, and the "sole" out of the shoe near the toes for the heatsink. I then extracted all the polystyrene, leaving an empty shoe-shaped shell.
The paper had become surprisingly stiff cardboard. It held its shape very well and knocking on it made a very pleasing rigid hollow sound.
I then took some solvent-based craft glue and glued the fan onto the end of the shoe. When I applied power to the fan, there was an impressive amount of air coming out the bottom of the shoe.
 Finally, I glued the shoe onto the heatsink of the graphics card. After drying in the oven, the whole card-shoe assembly became very solid, with the new fan really feeling part of the card. I used an elastic band when drying it, but I decided to leave it on permanently.
 Here's a closeup of where the pipe attaches to the heatsink. The glue forms a seam around the top of where the fan used to be.
For power, I used the old trick of running the fan under the rated 12V. This is much quieter, if you don't need full airflow. In this case, I run the fan at 7V by connecting it between the 12V and 5V wires on an unused power connector. You can find out a lot more at 7 volts, a first-rate site.
 Finally, I plugged the card into the computer and connected everything up. Fortunately, everything seems to have survived the static electricity, ovens, glues and everything else, and is now working fine.
The video card fan is still the noisiest in the computer (the CPU fan in this computer is wonderfully quiet) but it's a lot quieter than it used to be, and will do the job for another year or two.
Technical details:
- Medion MD8083 3GHz P4.
- ATI Radeon 9800XXL graphics card.
posted by mjd at
Monday, April 17, 2006
![]()
![]()

1 Comments:
Nice fix mate, may try it meself seeing has i have the same pc.
By Anonymous, at 7:44 am
Post a Comment
<< Home